Integrate Webpack into Your SAPUI5 Development Process
Why Use Webpack
Webpack is a great tool for web development. And I’ve use it in almost all of my projects ever since I found it in 2016. I even wrote some blogs in my another blog.
In short, webpack is a bundle tool for web developers, and what makes it special is that it can bundle EVERYTHING. Not just js files, but EVERYTHING.
You can check it’s official website for more details.
Today, I want to show you how to use webpak in your SAPUI5 project.
Use Webpack
Prerequisites
You can install webpack in 2 ways:
- Globally: means that you can install it once, and use it anytime/anywhere you want. But the downside is version compatibility. Some projects may need a lower version, but if you install a higher version globally, it won’t work for those projects.
- Locally: means every project can have it’s own version of
webpack. It certainly will not have any compatibility issue. But as you can think, the downside is it may take more space. And if you want to updatewebpack, you have to do it project by project.
In this series blogs (Yes, I intend to write more in the future, includes but not limited to show you how to use webpack to do bundling, performance tuning, code-splitting, even tree shaking.), I will use wepack locally, following the standard node.js project settings.
Download Example Project
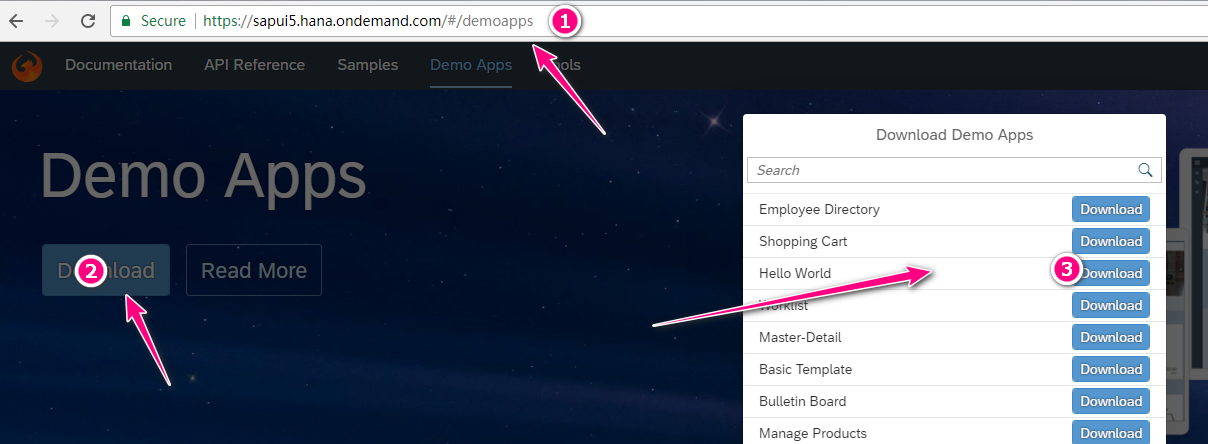
To start, let’s create a folder named ui5_pack, and download the Hello World example SAPUI5 project from SAPUI5 demo site by following the below steps:
- Goto demo site
- Click
Downloadbutton - In the pop up list, find the
Hello Worldand clickdownloadbutton - After file has been downloaded, extract the content into our
ui5_packfolder - Also grab a copy of the
SAPUI5/OpenUI5lib files - Create a folder called
resourcesand put the lib files in this folder - Change the
index.htmlfile to point thesap-ui-core.jsto our new location./resources/sap-ui-core.js
You can check to see it’s working by double clicking the index.html.
Generate Project Settings
Assume you have already installed node.js and yarnon your development machine, the first step we need to do is to generate a package.json file to store all our project settings.
Open you terminal, and input the following command under the ui5_pack folder:
yarn init -yYou will get a package.json file which contains all the default settings, something like this:
{
  "name": "ui5_pack",
  "version": "1.0.0",
  "main": "index.js",
  "author": "Sam Zhao <zhao.shengjun@gmail.com> (https://zhaoshengjun.gitlab.io/)",
  "license": "MIT"
}
Add Webpack
Webpack will be added as an development dependency, so is the webpack-cli.
In order to do this, we need to run the following command in the terminal:
yarn add -D webpack webpack-cliYarn will do a calculation based on all the dependencies we have specified in package.json file to determin the best version we need to install. But our example is simple because we have no other dependencies, so it will install the latest versions. If you look closely, you will see the following lines have been added to package.json file.
{
  ...
  "dependencies": {},
  "devDependencies": {
    "webpack-cli": "2.1.2",
    "webpack": "4.6.0"
  }
  ...
}
Rebundle Files
Using webpack, we can bundle the files we use. Let’s start with the js file. But first we need to make some changes.
First, we need to move the JavaScript inside theindex.html to a external file. In the second <script> tag, there are some code. We need to cut and copy it to a file named main.js and put it under a new new folder called src.
Then, we need to write a configuration file to tell webpack how we want it to work on our files. So create a file called webpack.config.js and put it in the root folder (not the src folder). The content of this webpack.config.js file is like this:
const path = require("path");

module.exports = {
  entry: "./src/main.js",
  output: {
    path: path.resolve(__dirname, "dist"),
    filename: "bundle.js",
  },
};
This file is a copy of the configuration file you can find on webpack.js.org front page and it’s the basics.
entrypart tells where we wantwebpackto start, as the entry point.outputpart tells what we wantwebpackto output our generated files. In this example, we tell it the generated file should be namedbundle.jsand we’d like it to be placed under folderdist. (Don’t worry if we haven’t create thedistfolder yet.Webpackis smart enough to create it automatically for us if there’s no such folder).
We also need to modify the index.html to use the new js file, but not directly using the src/main.js. We will use the generated file in the dist folder. The updated index.html file should look like the following:
<!DOCTYPE html>
<html>
  <head>
    <meta http-equiv="X-UA-Compatible" content="IE=edge" />
    <meta charset="utf-8" />
    <title>Hello World App</title>
    <script
      id="sap-ui-bootstrap"
      src="./resources/sap-ui-core.js"
      data-sap-ui-theme="sap_belize"
      data-sap-ui-libs="sap.m"
      data-sap-ui-preload="async"
    ></script>
    <script src="/dist/bundle.js"></script>
  </head>

  <body class="sapUiBody" id="content"></body>
</html>
The changes we’ve done so far is enough to make it running. So in your terminal, run the following commands:
webpackYou should see the dist folder is being created and the bundle.js is available. Then open the index.html file, and you should be able to see the app working as before.
Hooray! We made it! We can use the webpack with our SAPUI5 project from now on.
If you have trouble following along, you can check the github repo I created for this blog: ui5_pack
Next Step
In next blog, I plan to show you how to use webpack-dev-server to enable great features like live-reloading etc.
Stay tuned!